

Website redesign checklist
- Step 1: Establish your dedicated team of stakeholders
- Step 2: Audit your current site
- Step 3: Understand the user journey
- Step 4: Set goals
- Step 5: Define your strategy
- Step 6: Setting a timeline
- Step 7: Review and update (or create) your brand style guide
- Step 8: Gather inspiration and analyze the competition
- Step 9: Craft your content
- Step 10: Start designing
- Step 11: Develop your site
- Step 12: Launch your new site!
“Website redesign.” Two words that can make even the most veteran of marketers shudder.
When done right, a website redesign can improve the experience people have on your website and turn it into one of your most valuable sales tools. In fact, Marcus Sheridan, author of They Ask, You Answer, often calls your website your best sales rep.
However, when we cut corners and skip steps, a website redesign can easily go off the rails, costing your company valuable time, effort, and money, which could end up doing more harm than good to your marketing.
But don’t let these high stakes scare you.
With proper planning, research, and a little foresight, you can make your next redesign a huge success and avoid unnecessary stress — and we’re here to help.
IMPACT has been strategizing and designing websites for over a decade, and in this article, I will share:
- How to know if it’s time for a website redesign.
- My 12-step website redesign checklist to help set you and your team up for success.
Let's get started on the step-by-step process that will get you the website you need.
But first, how do you know if it’s time for a website redesign?
Before investing valuable company resources into a website redesign, you need to make sure you’re redesigning your website for the right reasons.
While there are a lot of good reasons to redesign your site, there are also a lot of bad ones. Issues such as “I just don’t like our website anymore” or “our competitor just redesigned their site” are poor reasons for a redesign.
If your existing website effectively attracts site visitors and converts leads, there’s no reason to change it. If your website effectively allows you to implement inbound marketing successfully at the highest level, maybe now is not the time.
Let your analytics, rather than your own subjective opinion, be the judge. Ask yourself questions such as:
- Is our business website currently optimized for mobile devices?
- Have our business goals changed since we last launched our site?
- Is the branding on our current website outdated?
- Does our website function properly?
- Is our website set up for easy updates and content publishing? (In other words, is it on a content management system that makes website maintenance easy?)
- Can our target audience easily navigate and find the best content to address their needs?
- How are our business website metrics? Are we converting leads on our website?
Based on your answers to these questions, you should get a good idea of whether or not it’s time for a website redesign.
(Note: These same questions will also help when it comes time to set your goals for a website redesign project, which we’ll dive into later.)
Assuming all signs do point to a redesign, here are the 12 crucial steps you need to take.
Step 1: Establish your dedicated team of stakeholders
Before any website redesign discussions can happen, you need to assemble a website task force (or simply a “web team,” but that doesn’t sound quite as exciting) that will oversee the project.
Having a dedicated team helps avoid the issue of “too many cooks in the kitchen,” which can really slow down the progress of a redesign.
This team should be a diverse, cross-functional group of people composed of no more than five, ideally from different departments.
This helps to ensure that you’re getting feedback from people with different points of view. A good website team will have a:
- Designer
- Developer
- Content writer
- Strategist
- Final decision reviewer from C-Suite
Within this team, you also need to determine the person who will be the leader of this project.
This person will have the final say when it comes to making approvals and decisions within the group and ultimately makes sure the project keeps progressing.
With your team in place, you’re ready to get started!
Step 2: Audit your current site
The steps you take to prepare and plan for a website redesign are usually a clear indicator of how successful your redesign project will be.
One of the most beneficial things you can do to start is complete an in-depth audit of your current website.
An audit will give you a bird's eye view of all the assets you have to work with and give you insight into what’s currently performing well on your site and what’s not.
When auditing your website, you want to:
Assess your website’s current page performance
I recommend building a sitemap of your current website and then reviewing the analytics of each web page to assess any noticeable user trends.
By analyzing key metrics — such as traffic, conversions, bounce rate, and time on page — you’ll be able to understand what pages people find useful, what pages might be missing, and what pages you can remove.
Overall, this will give you an idea of what pages you have to work with and come in handy later on when it’s time to put together the sitemap on your new website.
Complete an SEO audit of your website
A search engine optimization (SEO) audit is a comprehensive evaluation of your efforts to rank in search results and whether your site is set up to perform well.
The goal of conducting this type of audit is to identify any issues that may be negatively affecting your organic search performance. This can be either technical issues, such as the speed at which a page loads, or content-related ones, such as missing keywords.
Platforms like Semrush, Screaming Frog, and Google Search Console can help identify any issues with SEO on your site.
At IMPACT, we’re particularly fans of Semrush’s site health audit, which looks at over 120 factors when it crawls and gives you a percentage score based on what it finds.
Semrush groups issues into errors, warnings, and suggestions based on priority. The tool also tells you what the problems are and how you can fix them.

Keep a running list of any issues you find that you’ll want to address when creating a plan of action for your redesign.
Review your website’s current copy
A lot of businesses still make the mistake of assuming their website is all about them. Most of their content is geared toward telling users how great they are and why they’re unique, when in reality buyers want the answer to know one thing: Can your company solve my problem?
How well does your website copy answer this question?
Try going through your website and counting how many sentences include words like “you” versus “we.” In They Ask, You Answer Marcus Sheridan shares that the ideal ratio is five to one, meaning you should refer to your buyer five times more than yourself.
If you’re not hitting that ratio then it’s usually a clear indicator that your content needs to be reworked to focus on the buyer’s problems and needs.
Step 3: Understand the user journey
Similar to the buyer’s journey, a user journey maps out the different stages a user goes through on their way to a purchase, focusing on the different actions and emotions someone may feel in each stage.
The only way to really set yourself up for success is to understand what the user is looking for, what questions they need to have answered, and how they’ll look for them on your website on their way to making a purchase.
An important question to ask yourself as you plan for your redesign is “Are there any holes in our site’s user journey?”
Use customer interviews
There are a few ways you can go about obtaining the answer to this. One way, for example, is by interviewing your customers and asking them questions about their experience:
- What made you decide to purchase product X?
- Did anything on the website frustrate you?
- How did you navigate to page X?
After all, the goal is to reduce friction as much as possible to give prospects an expedited path to conversion. What better way to improve the journey than by actually asking them?
Use user testing
You can also set up user testing and ask your audience to perform different tasks on your current website. Services such as Userlytics and UserTesting make setting up a user test as easy as possible.
This will allow you to see first-hand how a potential customer interacts with your web experience and where you need to solve for their frustrations.
Where are users falling off in their journey? What areas of your site are they consistently interacting with? Are there any major issues or bugs on the site?
Implementing a heat mapping tool such as Hotjar or Lucky Orange is another great way to identify areas for quick optimization. These tools give you a more visual view of how people interact with your website by color-coding the different elements on a page that get the most and least interaction.
By focusing on the user journey and reducing any friction, you’ll be setting your redesign up to generate real results.
Step 4: Set goals
As we covered earlier, there’s a reason you need to redesign your website. Now is the time to dive into those reasons and set some specific goals.
With the amount of money and effort that goes into a website redesign, success is critical. Setting realistic goals for your site to reference and measure will allow you to do that. Based on what you uncovered during your site audit, you should have a good idea of what areas of your site need improvement. This is a good place to start for creating your goals.
For example, maybe you noticed that your current site has a steady stream of traffic, but the leads aren’t pouring in. Based on this finding, you may set a goal of increasing your conversion rate by 1% within six months.
However, data alone doesn’t always give us the full story. It’s also valuable to get ideas from the members of your team. Sending out a survey to different team members is a streamlined way to get that additional feedback.
Ask your team:
- What is the primary reason(s) you have decided to redo your website?
- What is your No. 1 goal for the site?
- What are the most important things you’d like a user to be able to do on your website?
This helps you truly understand what you need to focus on during a redesign.
Whatever goals you set should be communicated to the entire team so they can be front of mind while the site is being planned, designed, and developed.
These goals will be used to guide the reporting that should be set up either right before launch or shortly after.
Step 5: Define your strategy
With an understanding of your current website’s performance and a set of well-defined goals, you’re ready to build a strategy for achieving those goals.
What your strategy should include
Make sure you develop a fully-realized strategy:
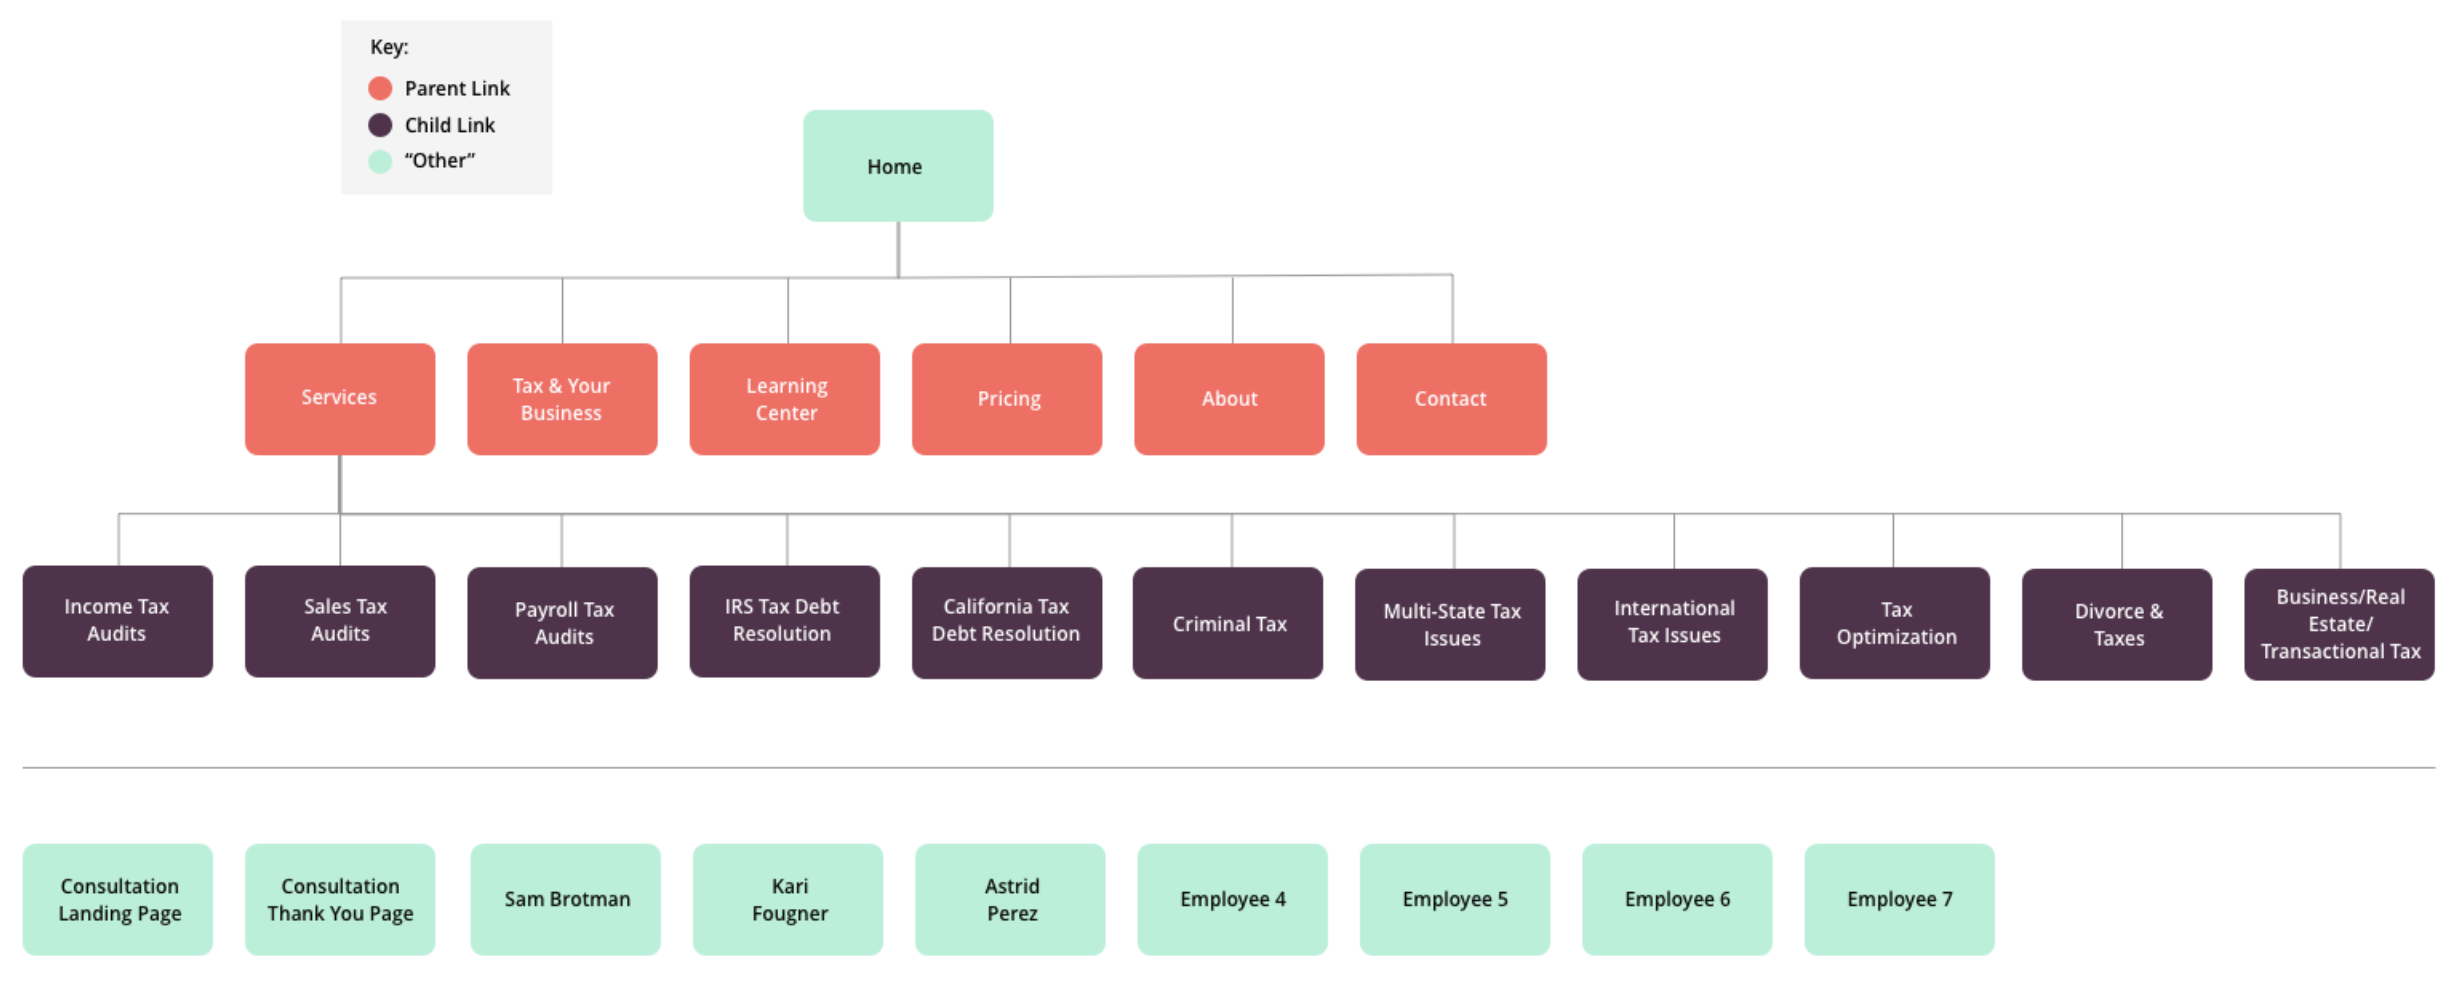
A new sitemap
During your site audit, you most likely discovered some pages that performed really well, some that no one visited, and others that you have no idea where they even came from. Your new sitemap is your chance to reorganize your existing pages, delete old ones, and add in new ones you might be missing.
I like to make a visual sitemap like the example below so I can understand the hierarchy of each page.
Messaging strategy
In the end, good web design is about effectively aiding and delivering the intended message. To do that, you need to have a clear understanding of what your message is.
What is the story you’re trying to tell on your website? What journey are you trying to take your buyers on and what are you helping them accomplish? What problems or challenges do you help them overcome?
At IMPACT, we find the most effective messaging strategy to be Donald Miller’s StoryBrand framework. In a nutshell, the StoryBrand framework is a seven-step outline of your value that positions your business as a guide in your customer’s journey to overcome a specific problem.
Once you have an understanding of this strategy, you can use it to frame the journey of your website and of each individual page. You can learn more about StoryBrand and your website specifically in our article “5 ways you can use the StoryBrand” framework to make a better website.
With this strategy, you can more effectively develop ideal user flows.
Ideal user flow
While the user journey represents the stages someone goes through when making a purchase, user flows map out the specific steps someone would ideally take within those stages to complete an action.
Mapping out an ideal user flow will help you start thinking about how people interact with your website, from a first-time visitor all the way to becoming a qualified lead.

Once you plan how someone would move through your site, you can start to figure out how to optimize the different parts of their journey.
It’s completely fine to start off with a very simple user flow like the example above. Once you launch your site and collect more data you can go back and refine it.
From here, you can create individual page strategies and content for your most important pages. More on that later.
Keyword research
Doing keyword research is an important step in optimizing your new site for search and gaining knowledge about what your visitors are looking for.
Knowing the terms your ideal buyers search for allows you to use those same terms when you're writing your site content. This not only helps you rank better in search engines but better resonates with your audience when they are on your site.
When it comes to performing keyword research, using a tool such as Semrush can save you a ton of time and give you the most accurate insights. Semrush comes packed with features like the Keyword Magic tool, Keyword Analyzer tool, and Position Tracking tool.
Keyword Magic is a particular favorite of our website strategists. This is an easy-to-use keyword research tool that provides all the keywords you need to build your most profitable SEO or PPC campaign.

With it, you simply enter a word and are delivered a report with suggestions as well as competitive density, difficulty, search volume, and SERP features.
Step 6: Setting a timeline
With a plan in place for how you want to accomplish your goals, it’s time to set a realistic timeline for doing it. The important word here is “realistic.”
Remarkable websites take time. You don’t want to create a timeline that’s too short and forces your team to rush through important steps or leaves too much time and lacks a sense of urgency.
Unfortunately, there’s no magic answer for how long a website redesign will take. A lot of it depends on the size of your website and how many levels of approval you’ll need along the way, but you should plan to spend anywhere from 2-5 months on your redesign.
Consider when you’ll definitely need your new website. Are there any events coming up? Trade shows? If there is something pressing, get started as early as possible so you’ll have adequate time to get the quality website you desire.
Once you decide on your preferred deadline, break that deadline up into smaller pieces and set milestones. These milestones will help you keep an eye on how on or off track a project is.
As you go through the project, make sure you track your progress against the deadline and readjust your deadline if necessary.
Under more of a time crunch? Consider starting with a launchpad website.
A launchpad is a site that looks and performs better than what you have now, and is scalable, but is still in the process of evolving in terms of design. Get the 20% done that does 80% of the work and collect the data needed to iterate and improve later.
Step 7: Review and update (or create) your brand style guide
Your brand style guide is one of the most important tools your company has — and if you don’t currently have one, now’s the time to make one!
Your brand is what people think of when they hear your company’s name or see your logo. It’s what you represent and who you are as a company.
A brand style guide ensures that what you want your brand to say and what you’re actually communicating are aligned. It’s a set of guidelines that make your brand understandable and replicable by anyone in your company.
That’s why it’s so important to make sure these documents are updated before you start gathering inspiration and moving into design.
There are two major parts of a brand style guide that you’ll want to make sure are updated and accurate: messaging and visual.
Messaging style
This comes back to the messaging strategy we mentioned in step 5. If you don’t know who you are or what you’re selling, your website strategy and copy will be flawed at best and totally inaccurate at worst. That can wreak havoc on the timeline because things will constantly change.
To avoid this, we suggest doing a StoryBrand BrandScript, that outlines the seven pieces of your framework and helps you determine the words you use to describe your value.
Visual style guide
A visual style guide documents the — surprise, surprise — visual elements of your brand. These elements can include:
- Typography
- Image treatments
- Color palette
- Iconography
- Logo usage
When reviewing your visual style guide, think about how each element aligns with your company’s current brand.
Is your typography sending out the right message? Do you have a well-defined color palette that evokes the right emotions? How should people use your logo in different use cases?
Once your brand style guide is in order, it’s time to start gathering some design inspiration.
Step 8: Gather inspiration and analyze the competition
While working through your strategy, you can also start thinking about design (finally!).
It’s smart to do it that way because 1) it speeds up the process, and 2) strategy should dictate design. But design can dictate functionality (e.g., we know we want a pricing module on the page, and a great UX designer will have input on the best way to lay that out).
I recommend doing a deep dive into two or three competitor websites as well as one or two websites outside of your industry. This will give you a view of industry standards as well as where you can shake things up a bit (as long as it benefits the user).
Gathering these assets will also allow you to discuss, as a team, what visual elements and styles you want to incorporate. This ultimately helps confirm that your entire team is aligned on the visual direction of your redesign and that it aligns with the overall goals of the project.
When looking for inspiration, try to answer questions like:
- What feeling should a visitor get when visiting your site?
- What new tools and features should your new site have?
- What types of imagery and graphics should you use?
As you gather inspiration for your new site, make sure you’re saving the different elements you like. The best way to do this is by putting together a mood board for your team to reference during the design phase of your redesign.
If you’re not familiar with mood boards, think of them as a collage of different images and text that visually explain the direction you want to take your designs.
A mood board can include things like typography styles, layout samples, imagery treatments, iconography, color palettes, or even entire websites.

Sample IMPACT mood board
There are a ton of different platforms out there to help you create mood boards. You can use free tools such as Pinterest or Canva or, for a more premium experience with more customization options, you can also use paid tools such as Invision Boards.
Whatever tool you use is ultimately up to you and your team. Just make sure you’re documenting the inspiration you’re gathering.
Step 9: Craft your content
One of the hardest things for teams to do during a redesign is to focus on content after design.
It’s easy for teams to be overzealous and want to jump right into design so they can see all of their hard work start to come together. Plus, let’s be honest, it’s usually the most fun part.
They figure, “We’ll just write the content after and fit it into the designs we’ve created.”
This is one of the biggest mistakes you can make during a website redesign.
It pushes people into a mindset that content is more of an afterthought that can always just be done later.
Not to mention that trying to retrofit content into an already existing design creates elements that rarely line up properly and usually force you to either make unforeseen design revisions or sacrifice the quality of your content.
Your content should always dictate the layout of your website pages. Design is meant to enhance your message, not distract from or overpower it.
Many people lean toward the design-first approach because they’re not sure where to start when it comes to creating their content. It feels like looking at a blank slate.
Fortunately, it doesn’t have to feel this way.
This is where page strategies come into play. After you complete your StoryBrand Framework and BrandScript, we recommend creating page strategies that outline how the story will be laid out on the page.
Take note of things like where calls-to-action to premium content can be introduced, where FAQs go, and where blog/learning center content can be introduced. This will guide the design.
It’s important to note, however, that not all pages require strategies.
People should just focus on the 20% of their website that drives 80% of the conversions (i.e., homepage, pricing, service/product details, and a direct bottom-of-the-funnel landing page). Pages like these carve out the main path that takes users from the top to the bottom of the funnel.
You can use tools like Trello or GatherContent to organize these pages.
With your pages organized into more manageable chunks of work, start creating content wireframes that break down exactly what content and information needs to go on each page.
This will help you focus on the story you’re telling for each page and cure that feeling of looking at a blank slate.
When creating your content make sure you’re constantly looking for opportunities to educate your visitors.
A simple exercise to see how well you’re educating visitors is to brainstorm the top 25 questions you constantly hear from buyers about your product or services. Make sure you’re answering those questions in the pages on your new site.
Also, look for opportunities to include the following in your content:
- Self-selection tools
- Premium content like ebooks, whitepapers, and buying guides
- Video
- Social proof such as testimonials, customer reviews, and case studies
These are powerful assets that can be used to educate and inform your prospects and keep them moving through the buying process.
If you’re ever tempted to skip the content-first approach, just remember that while a person’s first impression of a website is based on visuals, it is strong and helpful content that keeps them engaged and wanting more.
Step 10: Start designing
Being a designer, I’m a little biased, but this is the best part. Now’s the time your weeks of hard work come to life and start to take shape.
It may be tempting to dive in and start designing all of your pages, but instead, you need to take it slow and make sure you’re getting constant feedback and buy-in along the way.
Using tools such as InVision or Zeplin can help streamline your feedback and make the design process much more collaborative. Both design tools integrate with most of today’s design programs.
The most popular way to start the design process off is by creating wireframes. These can be simple black and white designs that show how you’d like to lay the content out on each page.

Sample IMPACT Wireframe
Wireframes will keep you focused on the content and allow you to make sure you’re laying the content out in the best way possible.
When you are ready to move into creating full-page designs, start out by designing the first three or four sections of a high-impact page (I like to start with the homepage) and then bring the design back to the team for feedback.
This can save you time and unnecessary revisions in the long run by making sure your design is going in the right direction.
Once your team is fully aligned on a design direction, you’re off to the races. Work your way through each page, making sure you’re getting that constant feedback and buy-in from the team.
Step 11: Develop your site
Development is typically the final stretch for any redesign, and our website redesign checklist is no different.
It’s been a long process to get to this point, so there’s a lot of anxiety that can go along with this step, but rushing development can be a recipe for disaster and delays.
Dedicate ample time for the site to be coded out cleanly, following SEO and industry best practices — as well as the design you fell in love with.
In this step, your team, internal or external, will transfer the flat design mockups that were created, into HTML, CSS, and other languages.
As pages are developed, make sure you’re checking for cross-browser functionality to ensure a consistent experience for all users. This gives you peace of mind that no matter what browser is used, your site will display exactly as intended and also ensures your users are getting a fully optimized experience.
The same goes for mobile devices. Going through the variety of screen sizes takes time.
Typically it’s a good idea to determine the most popular devices and test those. Google Analytics can help you. This gives you a realistic snapshot of what your site looks like on different devices, again ensuring a consistent user experience that won’t frustrate anyone.
Step 12: Launch your new site!
You’ve made it! After months of auditing, planning, designing, and developing you’re finally ready to launch your new site. That’s super exciting!
Before launch, make sure you perform a pre-launch review of your site to confirm that everything with your new site is in order and ready to go. Your pre-launch review should include:
- Checking for any broken links
- Making sure your 301 redirects are all set
- Verifying that the meta descriptions and page titles are correct for every page
- Checking for any broken or missing images
Double-checking all of these items will not only save you from the future headache of rushing to try to fix issues post-launch, but also ensure a smooth transition for people from using your old website to using your new one.
Next, I’d also recommend doing a Semrush site audit before launch and comparing it to the one you took at the beginning of your redesign process. It’s important to be able to compare site health and make sure that nothing became less effective during the redesign.
When you’re positive everything is ready to go, send that site live, and pour yourself a drink!

Immediately after launch, make sure that all the pages are rendering properly, your analytics and heatmap tracking codes are in place, and you’ve submitted your new sitemap to Google Search Console.
So now you can kick back and watch the leads flow in. But your work is not done.
Plan experiments, then rinse and repeat
Your brand new website is developed and launched, but the fun doesn’t stop there. Now you have to start collecting and reviewing your user data on the new designs.
Work with your team to plan experiments to A/B test different layouts, or features, to help
improve the user journey. Focus on the most important pages on your website first, and go through steps 6-11 as many times as necessary until you ultimately hit your goals — and then set new ones!
Create reports, whether in HubSpot, Google Data Studio, Marketo, or another platform, to help you see how you’re doing. Someone in marketing needs to be able to compare pre-launch metrics to post-launch metrics. Benchmarking leads, conversion rates, keyword rankings, site speed, and site health are especially important.
These tests and the subsequent changes you make as a result will only help improve your website’s user experience, lead generation, and overall effectiveness.
Remember, preparation is key
That’s our website redesign checklist! It’s not always easy to follow it by the book, especially when there are tight deadlines or time constraints. However, following it as closely as you can will help you make your new website the traffic-driving, lead-generating machine you’ve always wanted.
Remember, when thinking about starting a redesign project, the first step is to always assess why you want to redesign your site. Make sure there’s sound reasoning behind your decision.
From here, the success of your redesign will all depend on dedicating the right amount of time to preparation and planning.
Make sure you understand things like what current assets you have to work with, what areas of the site you want to improve, and what goals you will track to see if your redesign was successful.
Follow these steps and you can’t go wrong.
Are you implementing inbound marketing and want to make sure your website is set up to execute your strategy successfully? Check out our course Elements of a Great They Ask, You Answer Website for an in-depth breakdown of what a great inbound marketing website looks like.
Happy redesigning!
Free: Assessment
/Assets/Icon%20Library/x%20corp.svg)
/Assets/Icon%20Library/whatsapp%20logo.svg)
/Assets/Icon%20Library/Email.svg)
/Assets/Icon%20Library/Arrows/Grey%20Arrow%20-%20Prev.svg)
/Assets/Icon%20Library/Arrows/Grey%20Arrow%20-%20Next.svg)