/Assets/base/Navigation%20Icons/TAYA.svg)
/Assets/base/Navigation%20Icons/Sales.svg)
/Assets/base/Navigation%20Icons/Web%20design.svg)
/Assets/base/Navigation%20Icons/HubSpot.svg)
/Assets/Icon%20Library/AI%20Mastery.svg)
/Assets/Icon%20Library/Learning%20Center%20Laptop.svg)

/Assets/Icon%20Library/x%20corp.svg)
/Assets/Icon%20Library/whatsapp%20logo.svg)
/Assets/Icon%20Library/Email.svg)
When you create videos for your audience, you’re establishing just how qualified you are to be telling people the information.
Whether you’re showing them how passionate your customers are about your product or service, or educating them on a new product, the way you present yourself via video says a lot about your company.
Video is both an art form and a science and like any science, there are a lot of technical details you need to get right in order to be successful.
Don’t let these little things get in the way of delivering your message and achieving your goal through an amazing video
1. Framing
Framing, in the video world, refers to where your subjects appear on the screen; the composition of what people see.
People know what looks good and can spot the work of an inexperienced videographer from a mile away. If you frame your subject incorrectly, your viewer can end up focusing on the wrong thing.
Seeing an awkward amount of space above someone’s head, or cutting off a shoulder can distract your audience from the most important thing: your content.
When it comes to composition, the most important things to remember are:
-
the subject
-
the rule of thirds
-
head room
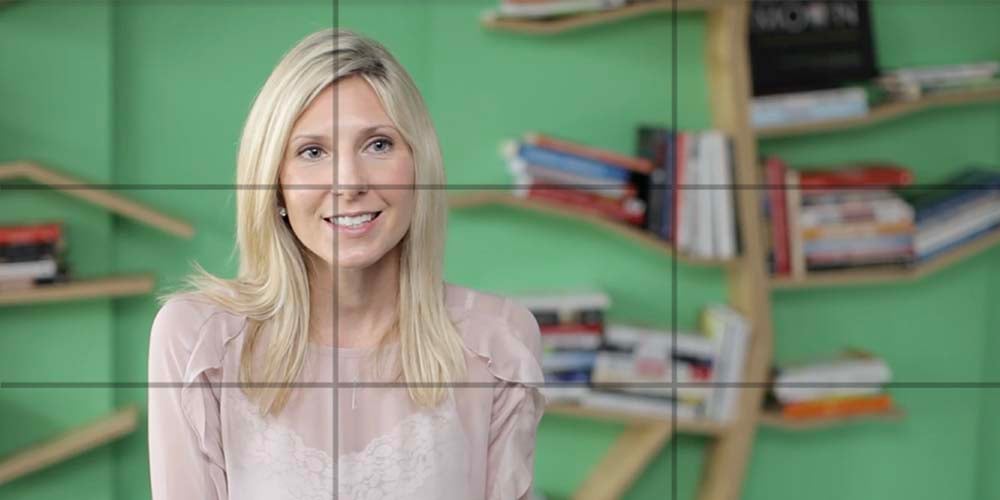
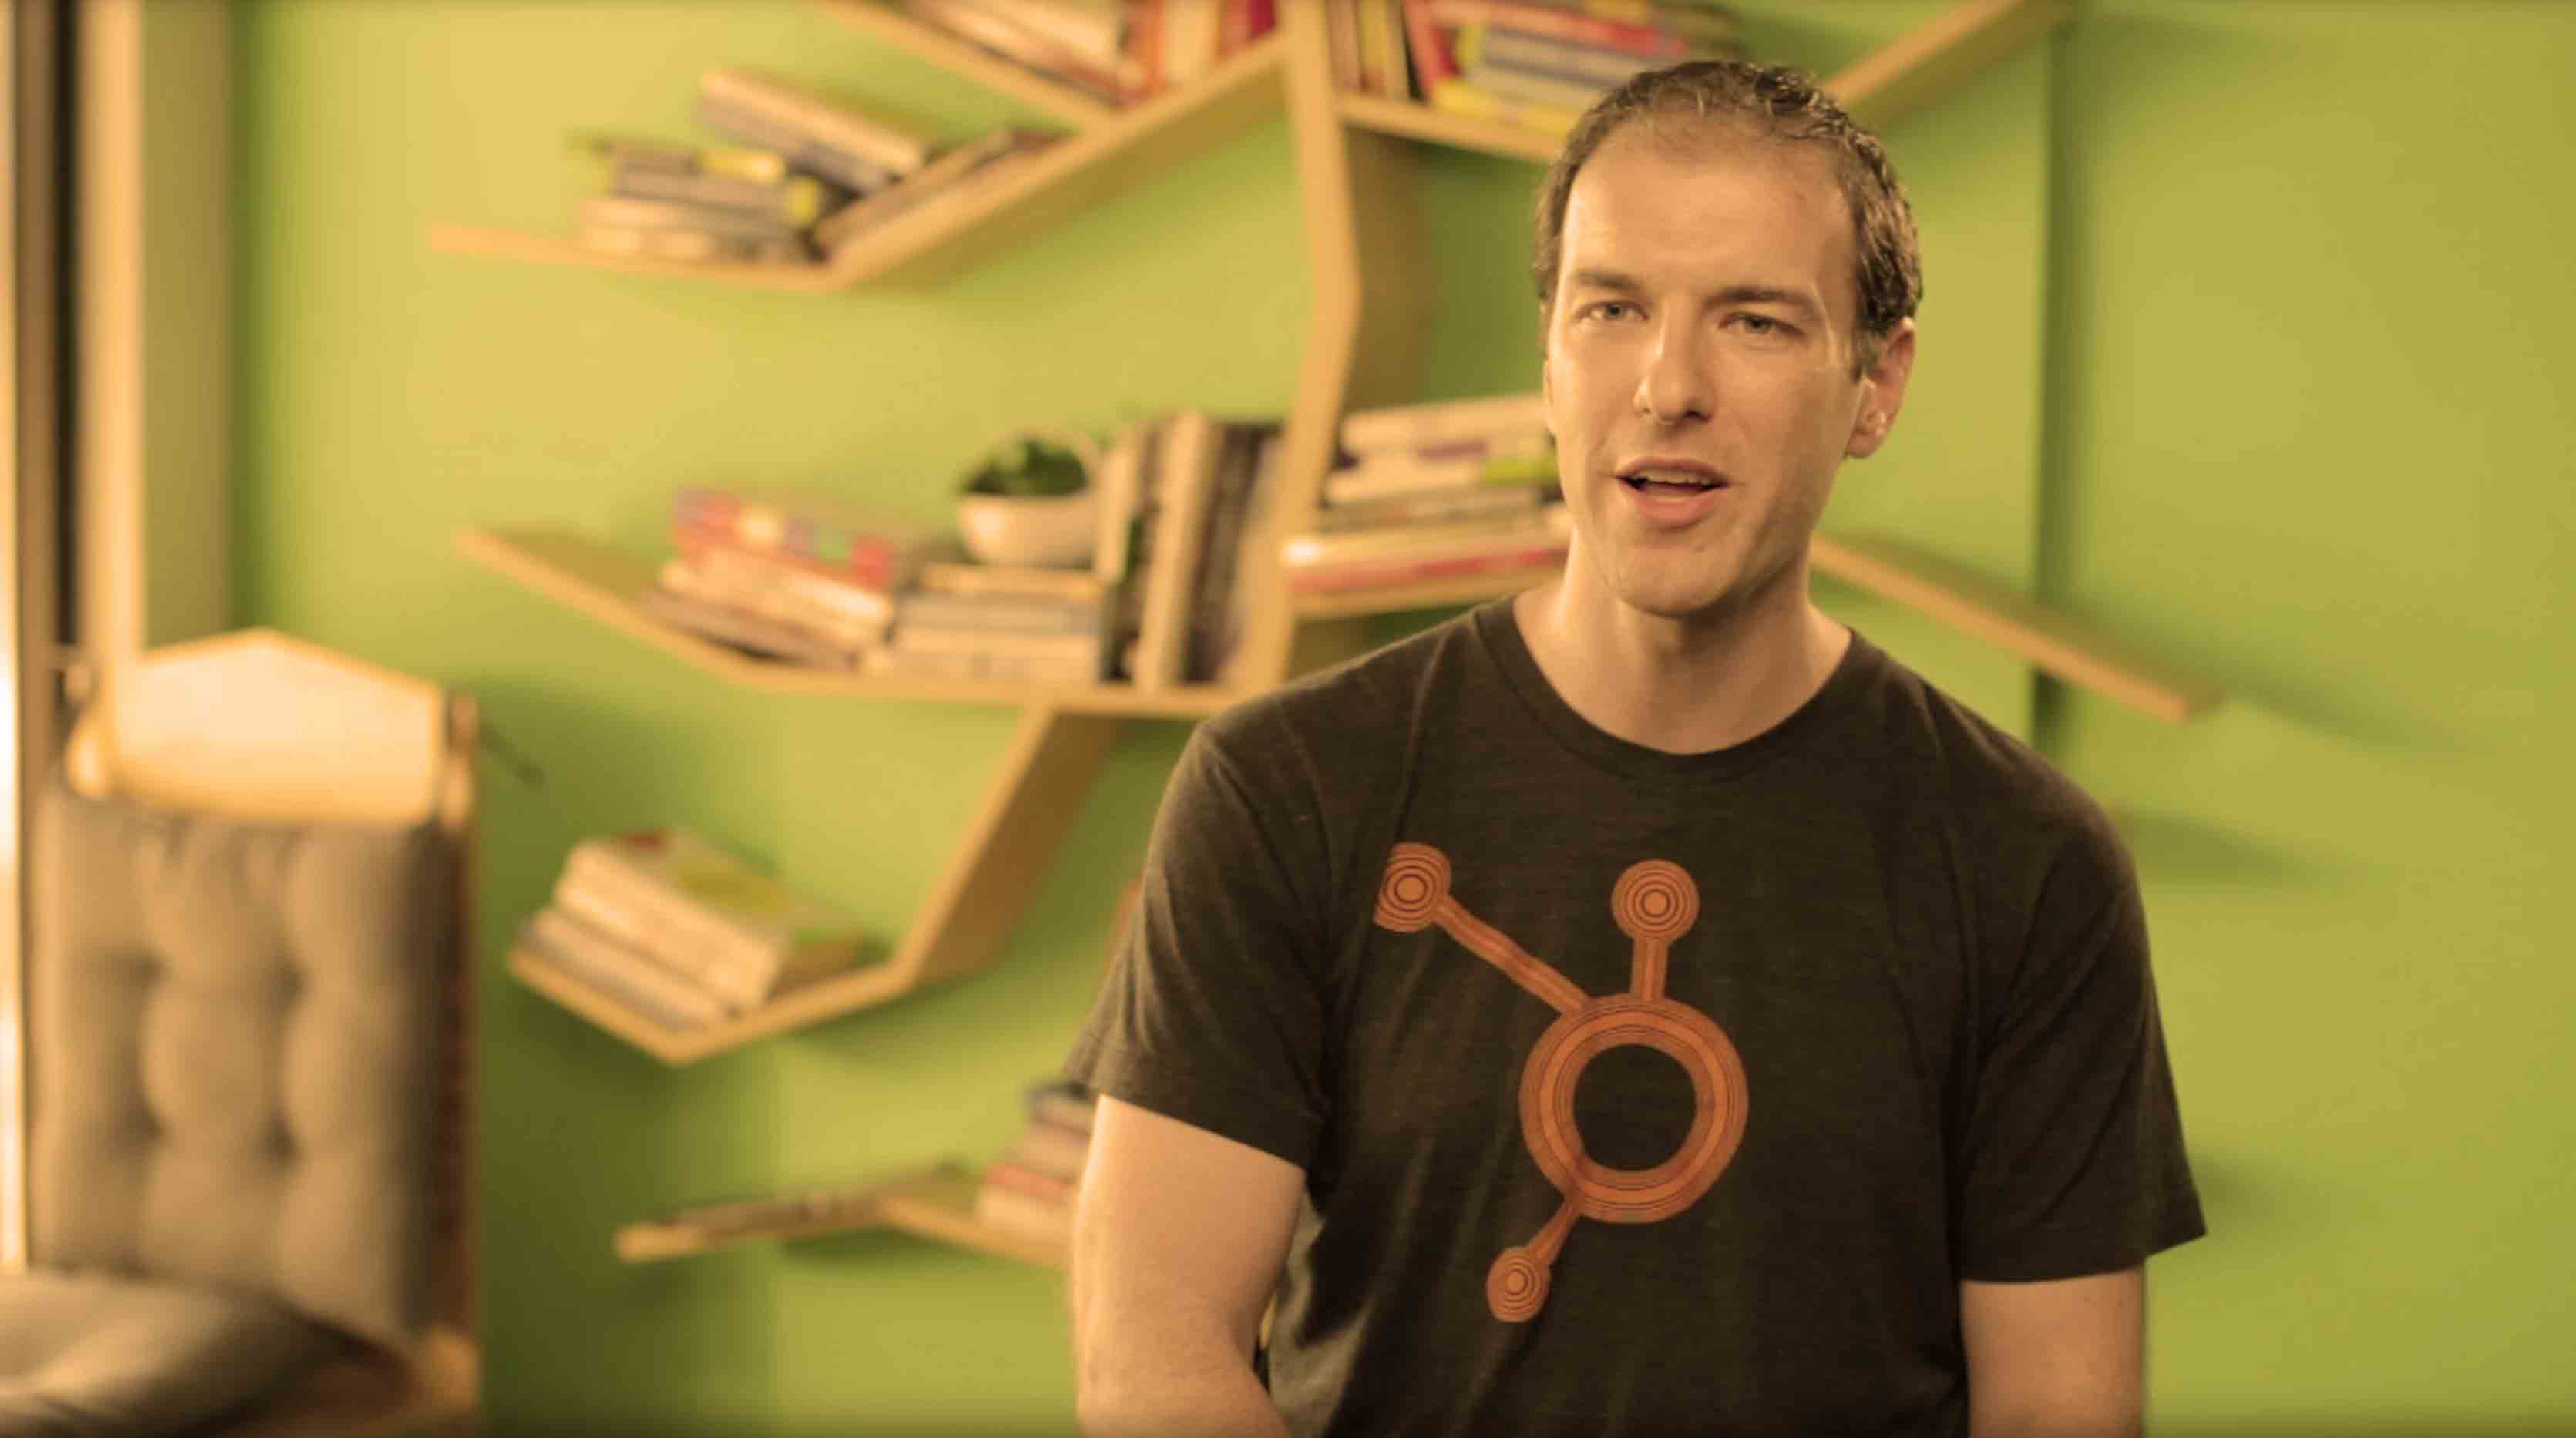
The Subject & Rule of Thirds
The rule of thirds is simple. It’s the rule of composition that states that the subject (what you’re focusing on when you film) will be best framed if it is in the intersecting lines of the left or right third of the image.
For example:
Myriah (the subject) is placed in the right intersecting lines of the grid.
The important thing to note here is that the other third of the frame is not completely empty. We have the chair and the bookcase to even out the frame.
Frankly, empty space is not aesthetically appealing. A well-framed shot can engage the viewer more than almost anything else. If your viewer actually wants to watch your video, they’ll be more likely want to listen to what you have to say as well.
Headroom
You’ll notice too that Myriah has just enough headroom, meaning the space between the top of her head and the edge of the frame. Nothing in this shot feels claustrophobic.
This is important for a similar reason to balance. If you cut off someone’s head in a shot, it will not only look strange and act as as distraction, it will come off as unprofessional.
Compositionally, you need to give your subject enough room so they don’t feel confined.
You will find many prosumer cameras (like most Canon/Nikon DSLRs) have built-in grids just like this one, that you can use to set up your shot.
Framing applies to all kinds of footage, not just interviews. You can use the rule to compose excellent b-roll shots as well.
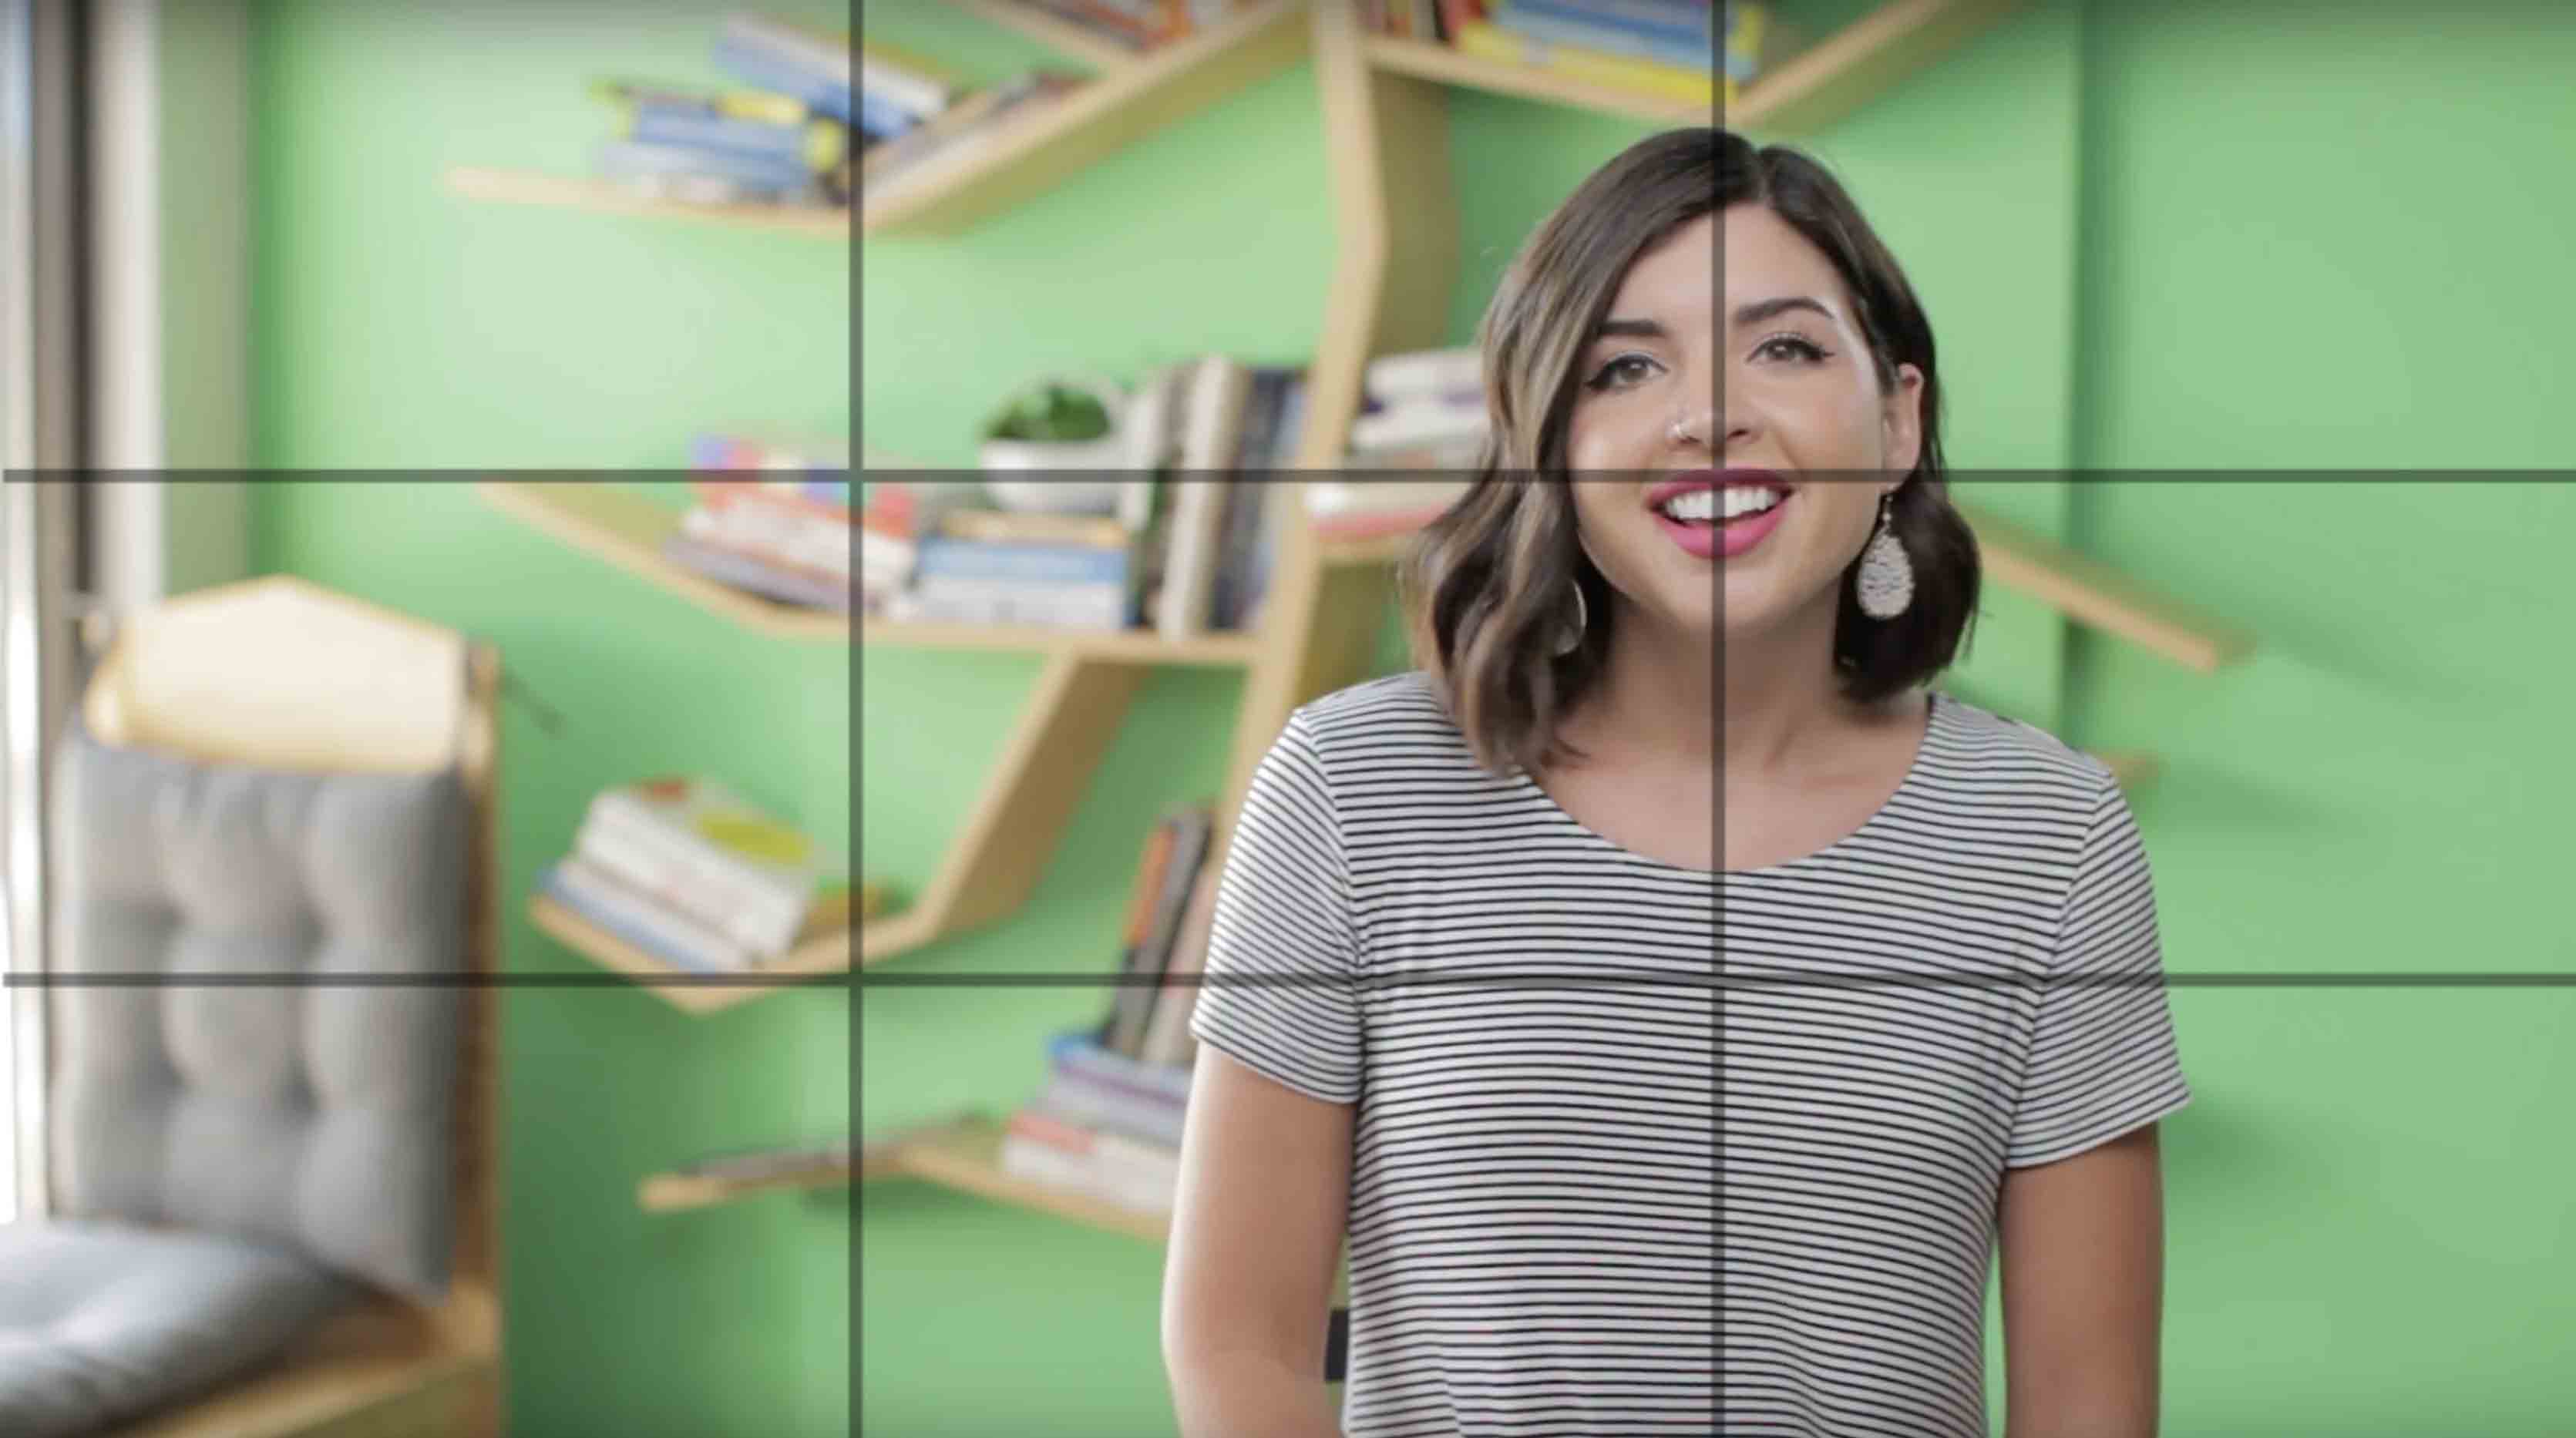
2. Eyeline
An eyeline is where your subject looks in relation to the camera.
This is important because our brains have evolved to instinctively fill in blanks. In the case of a video, if you’re leaving too much room behind someone, for example, a viewer’s eye is drawn to it expecting something else will be coming into the frame to fill that spot.
Appropriate eyeline helps avoid this. Even if audiences don’t know why, they’ll feel uncomfortable if you have a subject looking off into different corners of your screen.
This may mostly come into play in your interviews such as your customer testimonials, employee bios, and 80% videos.
Here’s an example:

In this kind of interview, we have our subject, Tom, looking off camera, to the unseen interviewer. Since Tom is framed on the left, we made sure to put our interviewer on camera right.
Camera left or right just means the right and left sides of the screen. Having Tom look off camera right gives him enough space to look where he needs to.
If we had framed him on the right and still told him to look off to the right, it would have been awkward, like this:

As I mentioned earlier, our brains have evolved to expect something to come into frame behind him as there is a great deal of space left empty there. .
However, since this isn’t a Scream movie and we’re not expecting a ghost-masked maniac to creep into your interview video at some point, keep it simple: Frame on the left, eyeline camera right. Frame on the right, eyeline camera left.
Make sure your eyelines are the same across your angles too to ensure consistency and professionalism.
3. Exposure
Your exposure is how bright or dark your image is and can be controlled with the iris, ISO, and frame rate of your camera.
If a viewer can’t see the details of someone’s face because it’s too bright, or if they’re turning up your brightness because they can’t see them, they likely aren’t listening to the information you’re trying to share with them.
So, bear with me as I get a little technical.
Let’s talk about your camera settings and how you can interpret what your camera’s telling you about your image’s exposure.
In terms of brightness, never trust your screen alone. I’ve had my brightness on my monitor up so high I severely underexposed and image because I was compensating for the monitor, not the actual camera readings.
There are a few settings that I usually treat as unchangeable for certain settings. Let’s focus on an interview type video and run through what you’d look at one your camera.
For an interview, you probably want to have your f stop around 5.6. This gives your image, giving enough depth of field for your subject to move back and forth a little without going out of focus, while also giving it that nice blurry background.
(If you have a newer iPhone, you’ve likely seen this feature in your portrait mode.)
If you’re shooting in 24fps, the shutter should be around 50. This will be the optimal settings for an interview.
ISO is probably your most changeable asset on your camera in this situation.
Most lower end cameras can’t go over 800 ISO without the image starting to look grainy and noisy. That being said, you still have a little range to help you out with the exposure without messing with the other, more fixed, settings.
Most cameras will have an exposure meter like this one:
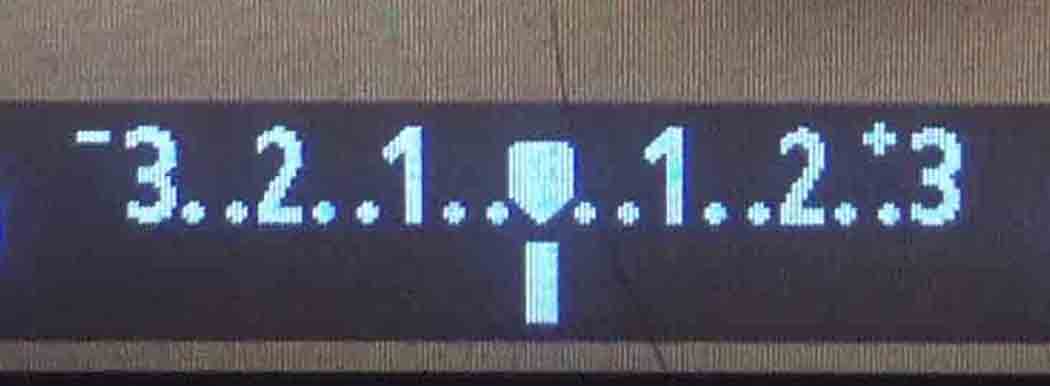
Understanding it is pretty simple. The middle is the correct exposure, the left is dark, and the right is bright. Most of the time you can get away with just this as a good indicator of your exposure.
Sometimes, if you have a large window in the shot, or a lot of dark clothing, the “proper” exposure, as told by the meter, will look wrong. Ultimately, the meter is just assessing the whole image.
For more complicated shots, you can use the histogram, if your camera has that option. Mine looks like this:

If you have your subject wave at you, you can see a certain part of the graph will move. You can then adjust your settings to ensure that your subject is correctly lit by letting that section fall somewhere near the middle.
If you’re in a situation where you must choose, underexpose the image. It’s easier to bring up details from shadow and reduce the noise than to bring down overblown highlights.
4. White Balance
White balance is basically how your camera sees the color white. If you’re inside, white looks a lot different to your camera than when you’re outside because light has different color temperatures.
Besides just being technically correct, the color of your image is important to any viewer and can highly affect the emotion and tone your video creates. I mean, there’s a reason Colorist is its own job on films and television.
Think of an image that’s a little more yellow, a little warmer. It’s more inviting.
Now think of one that’s a little bluer, a little colder. That conveys distance.
It’s something that every viewer feels innately. Making sure your image conveys the right color tone is one step in representing your brand and message correctly.
Trust me, you can’t always save it in post. You don’t want your subjects to look like they’re out in the middle of the night or have jaundice.
For example:
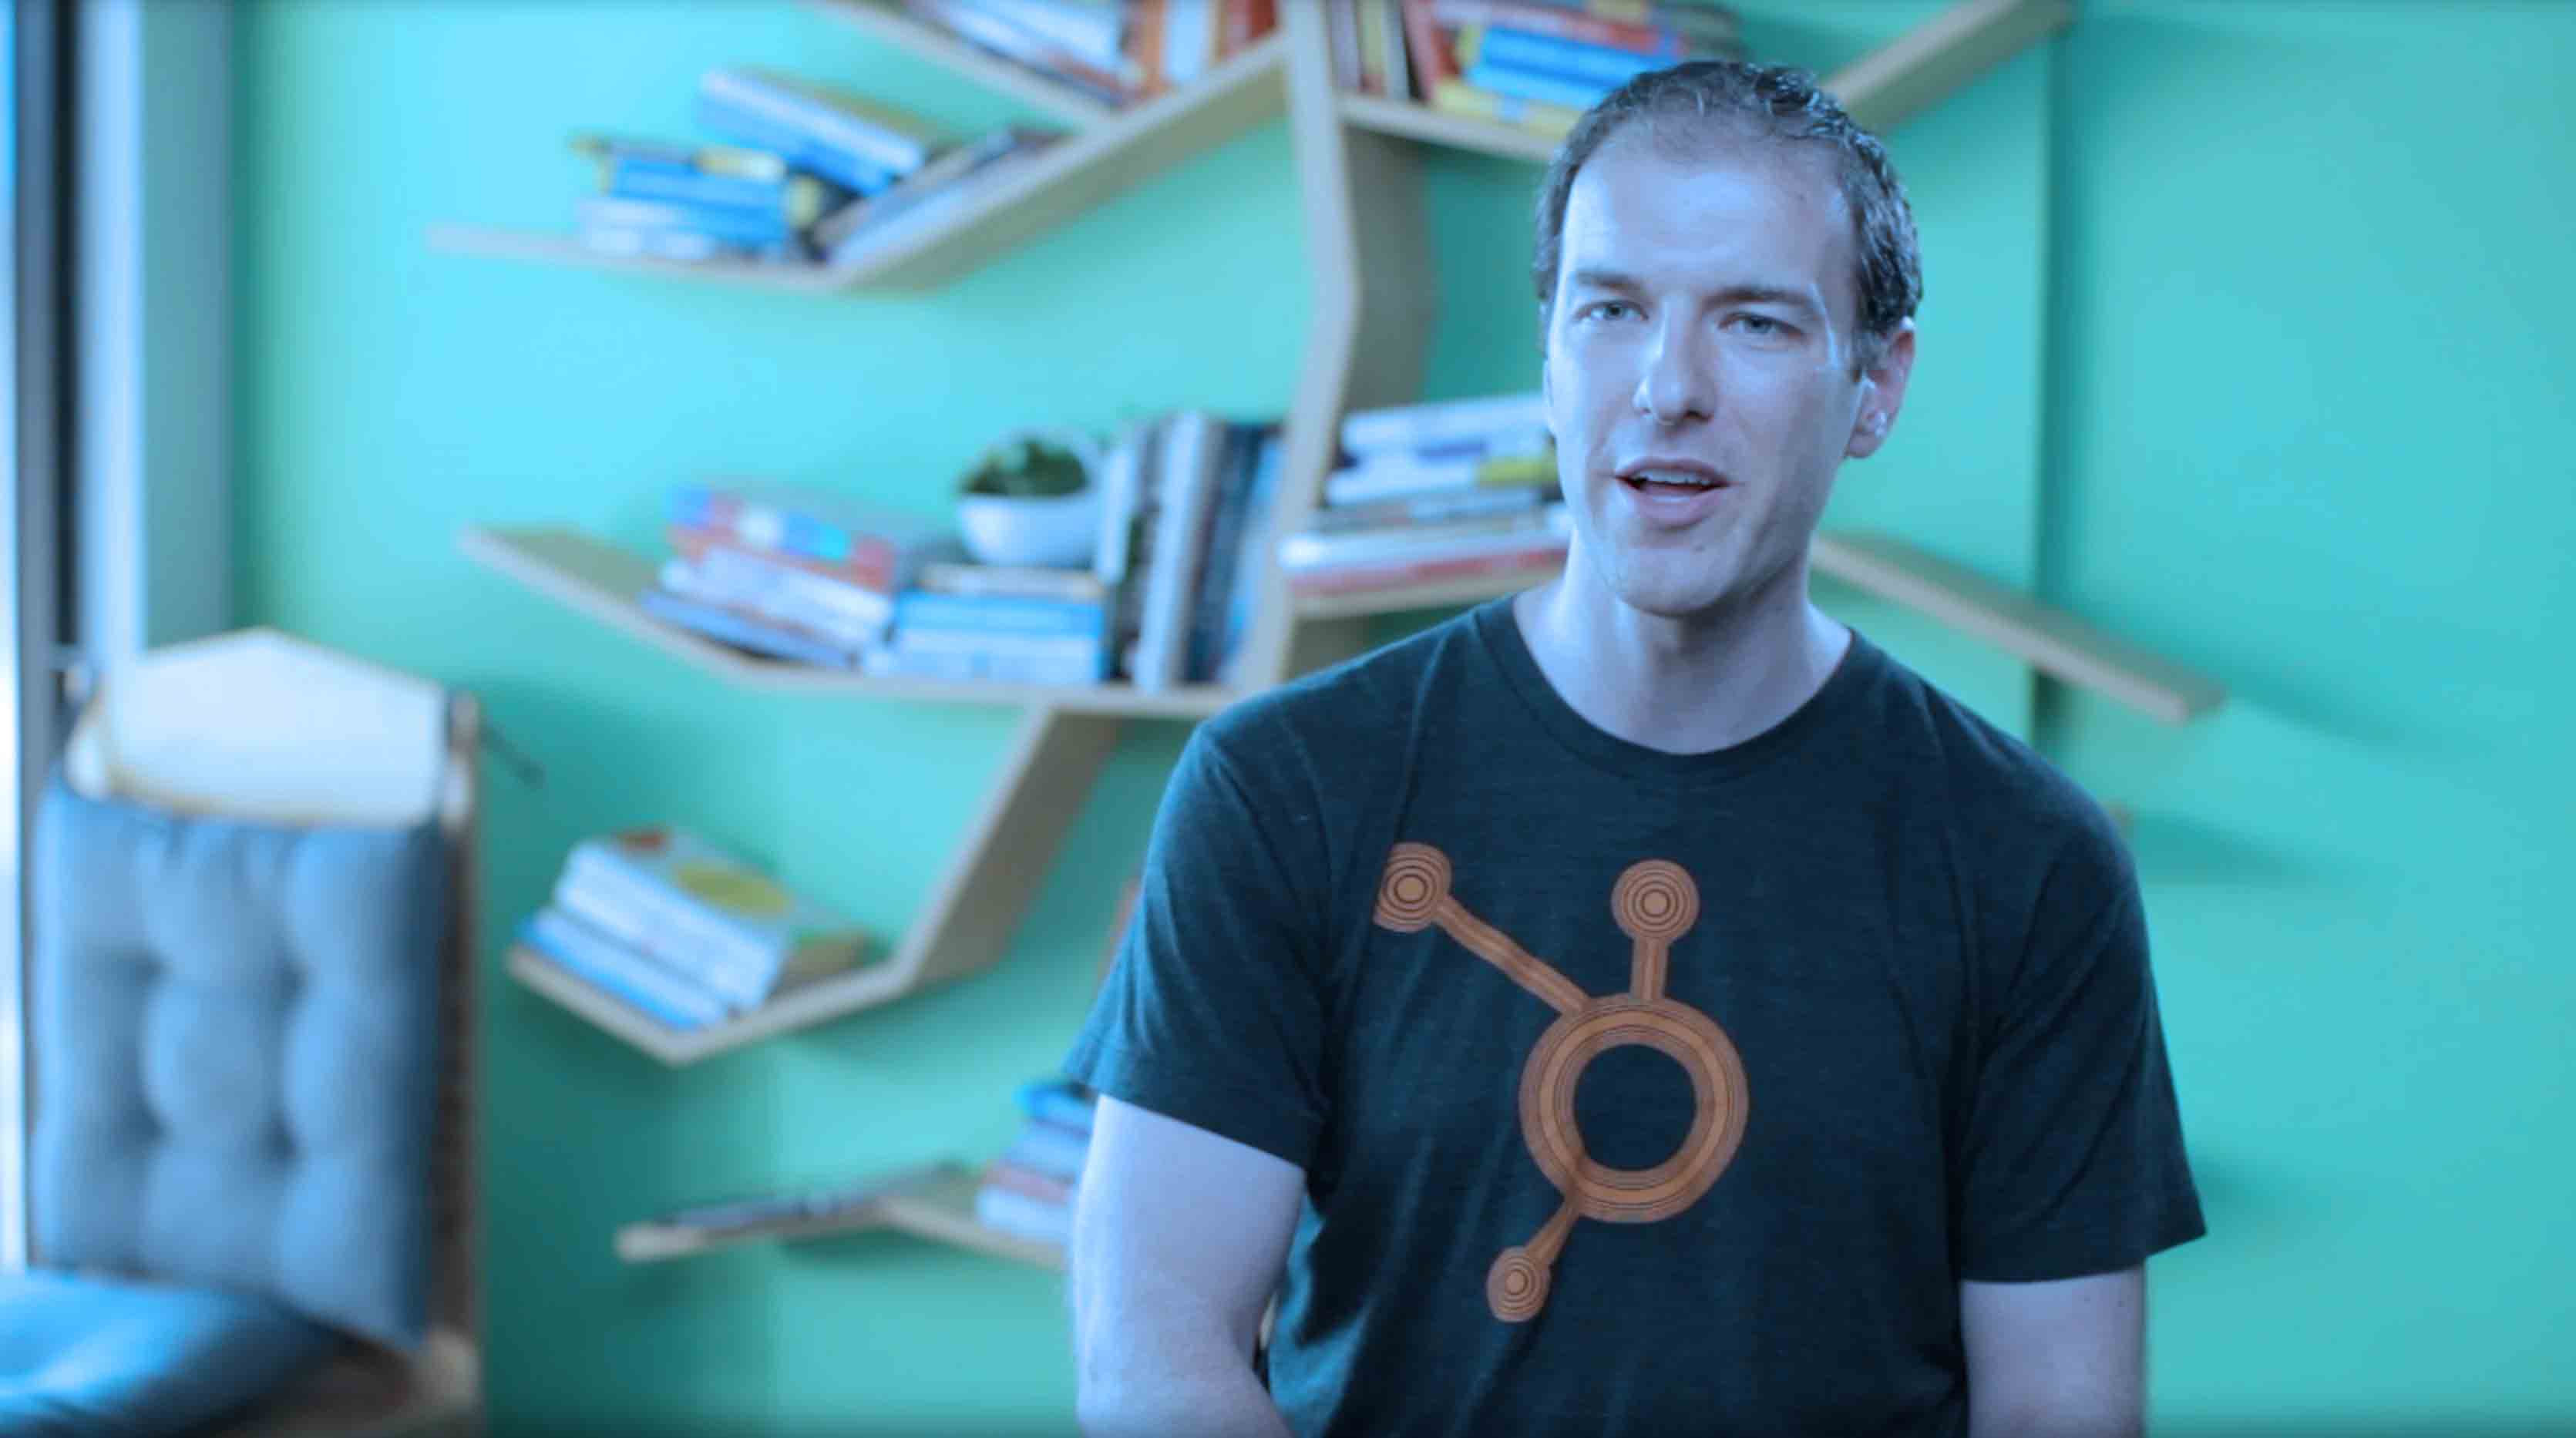
Look at Nick here. This image is obviously too blue. His skin looks washed out and sickly. The color makes it look like he’s in a police drama about to be interrogated, not a friendly sales video.
Here, Nick is too yellow. It looks like early morning on steroids. His skin looks yellow and unhealthy. It’s distracting to the viewer.
If you’re trying to show your viewers a heartwarming story of changing a client’s life for the better because of your service, you don’t want it to look cold and distant.
An easy way to understand and manage white balance in your marketing videos is to use the little cheat sheet most cameras give you:
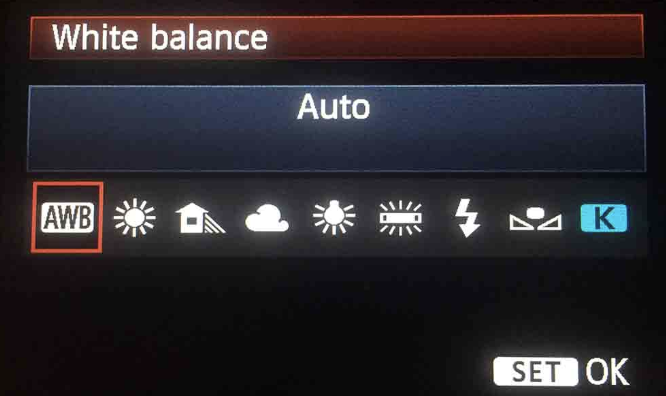
My advice on that though: don’t trust auto-white balance.
It’s fine for pictures, but with video, if you’re shooting in a room, with a window especially, any change in outdoor lighting will make your camera readjust automatically. This will throw your viewer off wondering why their image just changed color.
Whether it’s direct sunlight, shade, tungsten, or any others your camera lists, looking your camera’s manual to see what they suggest using will really help.
If you feel like memorizing the temperatures of different kinds of light, you can also change the exact color temperature on a lot of cameras, but I’ve never really needed to do that.
Another important thing to note is to match all of your cameras. If one angle is super yellow and another super blue, they’re not going to blend together well.
5. Audio
Especially for interviews, audio is arguably the most important part of a marketing video.
You want to engage the viewer, not scare them away with blaring audio levels or barely audible whispers. If it’s not perfect, people will likely stop watching immediately. (We’ve all done it.)
A good tip I’ve learned is to make sure your test sound is the same as their actual speaking voice. Many will test softer than they actually are.
In most settings where this happens, don’t be afraid to stop the subject to adjust their levels before they continue. Better to stop and get the audio right than try to save it later.
Levels for speaking should be around -12db when recording. It’s better to record a little lower and boost it than try to deal with peaking audio.
Keep an eye out for background noises as well, as they can be very distracting to viewers. Again, don’t be afraid to pause your interview to allow for loud noises to pass. It’s very difficult to isolate and get rid of those kinds of sounds in post.
6. Editing
There are an unlimited amount of things you can do in post-production to sculpt what you’ve shot into something enticing and engaging for your audience, which is why editing is so important.
If you’re interested in editing but don’t know what software is best, be sure to check out this article to help you decide.
One thing you can’t ignore in editing is color correction.
Even the most basic software can help you make sure your image looks its best. On a beginner level, this is sort of a combination of editing white balance and exposure.
If you were off a little bit, and your image looks a little too yellow, you can tone that down. If your image is a little too dark, you can brighten it up with color correction. This is your best buddy for fixing those tiny mistakes you made on the shoot.
Similarly, with audio, you can make sure those levels a bit above or below -12db get to where they need to be. You can also look through filters of your editing program to get rid of any consistent noises like air conditioners.
7. Export Format
Finally, the way you export your video is something you can’t overlook. You’ve made it this far paying attention to the details, now bring it through to the end.
Make sure you export according to your desired platform.
In addition to upload time, if you’re paying for storage for all your videos, there’s no need to keep the highest resolution either.
The presets will take care of things like compression and frame size, but if you are doing a custom export, make sure to look at the settings individually.
I’ve had to export very small videos for hosts with limitations, and you want to make sure you’re matching what you need so you don’t waste time re-exporting something. Keeping an eye on things like estimated file size can really be a time saver.
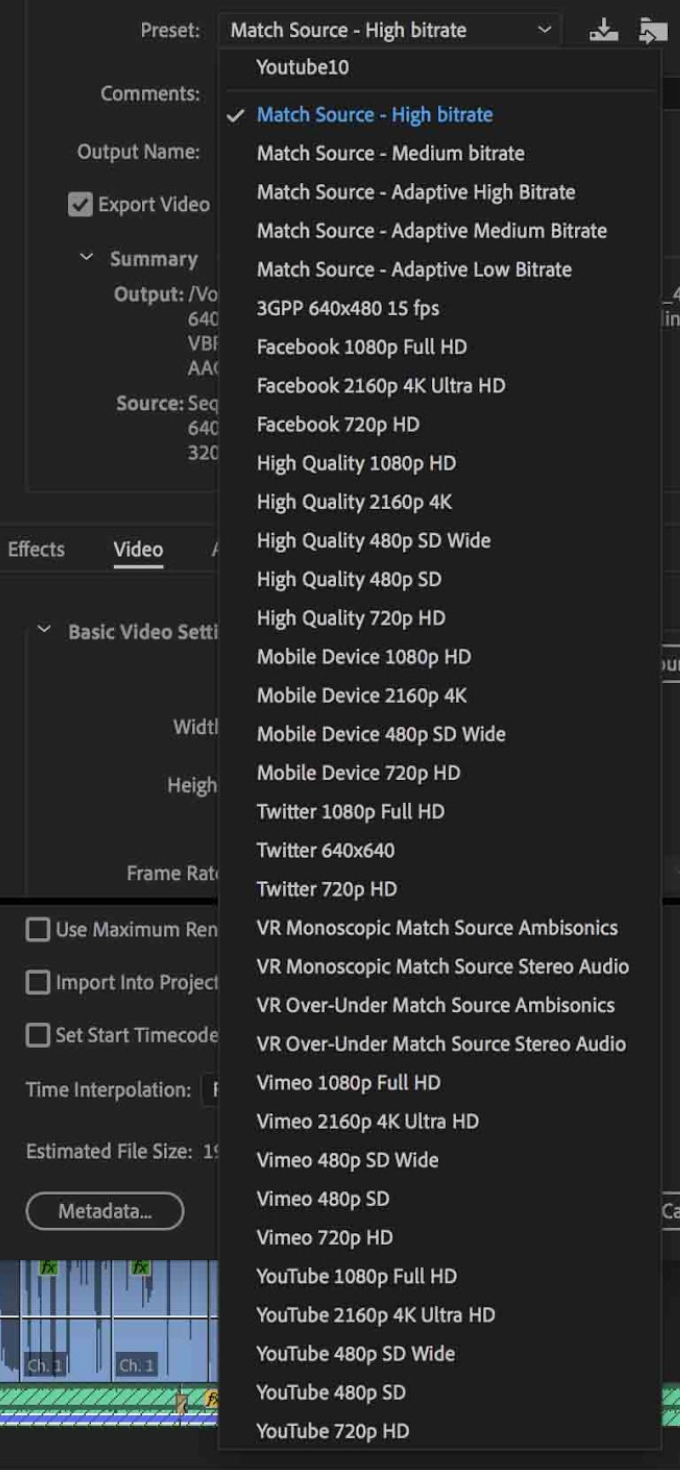
You don’t need to waste time uploading the highest resolution to Facebook when they’ll compress it anyway.
What It All Comes Down To
These are simple steps to take that make the world of difference in your marketing videos.
It doesn’t matter what you’re shooting on, you can get the most out of any camera when you know even the basics.
Paying attention to these details individually might not seem like it would amount to much, but everything together really impacts the way your overall video is received.
Being a perfectionist with video is worth it and you can only get better as you practice!
Free Assessment:
/Assets/Icon%20Library/Arrows/Grey%20Arrow%20-%20Prev.svg)
/Assets/Icon%20Library/Arrows/Grey%20Arrow%20-%20Next.svg)